You don’t need to travel far from home to have an amazing glamping experience. I’ll walk you through how easy it is to enjoy D.I.Y. Backyard Glamping.”
I have a new obsession. Glamping. Maybe you’ve heard of it?
Turns out, not many people have. Allow me to enlighten you. Glamping is “glamorous camping” or a “luxury camping experience”.
Sound like a misnomer? I mean really, who would ever confuse sleeping in a tent inside a sleeping bag as luxurious? Not I. And though my husband and I really enjoy camping, we’ve never been known to rough it.
Our early camping experiences are filled with a large two-room tent and air bed. Not simply an air mattress, our air bed sat up off the ground on a frame. I was even known to pack my white goose down comforter on occasion. I was a glamper long before glamping was cool, and I didn’t even know it. Glamping is my kind of camping and I’ve embraced it 100%.
When my husband drove from Ohio to Oregon and back this past summer, I tried unsuccessfully to secure a glamping spot for us near Yellowstone National Park for our anniversary. Unfortunately, the glampground was full. As were all other campgrounds in the area. My husband promised we could glamp another time, but with summer and fall slipping away I decided to take matters into my own hands.
My husband travels for work and I’d been trying to figure out a way to make his time at home extra special. So I had a thought. How cool would it be it I set up camp at our home for a DIY Backyard Glamping experience? Kind of a romantic weekend away for my husband and I without the travel? It may be hard to believe, but even I tire of travel once in a while. Besides, we rent a house in the country with 300 acres of land. We don’t need to travel far from home to make incredible memories. Check out the southwest style teepee glamping tent that I set up. I love how it turned out!
For those of you who may enjoy glamping but don’t want to set up your own site, check out these glamping posts:
Glamping in Ohio: Checking Out the Mohicans Treehouse Village
More Unique Properties:
An Overnight Stay in the Ultra-Retro Wigwam Motel in Kentucky
Plan Your Stay at the Hocking Hills Caboose
Sleep in a Treehouse when you Stay at this Amazing Ohio Property
Roughrider Cabins at Yellowstone National Park
Setting up your DIY Backyard Glamping Site
The first thing we had to do was decide where to place our tent. Originally, I thought it would be great to have our glamping tent set up on the edge of the woods, but my husband was one step ahead of me. He thought the tent would be better situated near the pond so when we looked out of the tent from our bed in the morning, we’d have a great view. Turns out his suggested location was the better option. Just look at this view.

Now, we could have used our pop-up tent, which I love. But crawling out of a tent that is fairly low to the ground doesn’t scream glamping to me. I definitely imagined something a bit more upscale. My husband suggested a Bohemian style tent and since buying one was out of the budget, we decided to build our own.

My husband used wood scraps he had around the house to build a frame which we draped canvas drop cloths over.
We nailed the drop cloths in place with a nail gun and brad nails, but a heavy duty stapler would have worked just as well, if not better.

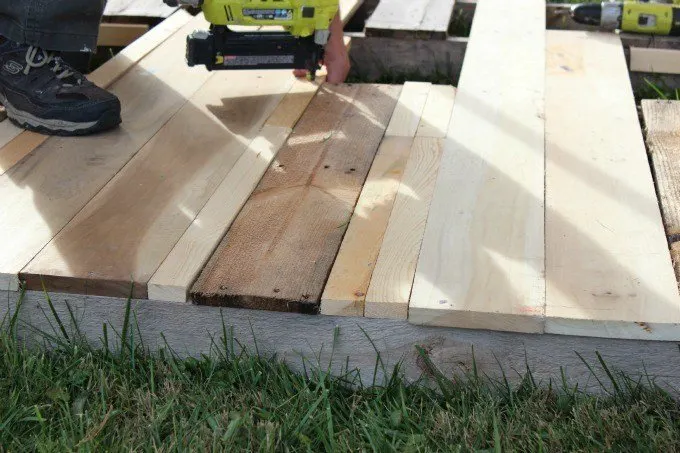
My husband even built a floor for the tent.

After our tent was up, it was time to move in and decorate. We used four wood pallets as a platform for our bed, and another for the headboard. I used a simple queen sized air mattress topped with a mattress pad. I don’t know if you’ve ever camped in cooler weather, but the air mattress always gets cold at night so the mattress topper was the perfect remedy.
If you love my bedding, head to your local Walmart. That’s where I found the comforter, duvet cover, pillow shams and throw pillows. I love it. It has such a romantic look without being too girly.

See the supply list at the end of this post to find the exact pillow shams, duvet cover and pillows.
I also added a shag area rug to the tent with a basket full of pillows in case we felt the need to lounge on the floor. In reality, our dog used those pillows more than we did, as we decided he should join us on our glamping trip as well.

Originally, I had hoped to have a dining area outside the tent with a ton of lights. That just screams glamping to me, but it was extremely windy with the tent situated on the edge of an open field, so we moved our table indoors. We had plenty of room for it and we didn’t need to worry about the wind blowing out our candles.

To me, glamping is all about surrounding yourself with nice things. Things you wouldn’t normally consider for a camping trip, but items that add a little bit of oomph. For me, that’s fabric, candles, lights, pillows and flowers.
While I initially planned this as a romantic retreat for my husband and me, our kids were impressed by our efforts and joined us off and on. And after I posted a photo of our tent on Facebook, I even had a few friends stop by to check it out as well.

We spent several days glamping. And by glamping, I mean hanging out at our tent site and cooking on the grill. But we only spent one night sleeping in the tent which was quite an adventure to undertake in Ohio in November.

Fortunately for us, the weather was unseasonably warm but we were prepared with an electric heater which definitely served its purpose. We were pretty comfy and snug.
It wasn’t the cold weather that forced us back inside the house, it was the ticks we discovered in our yard. After my husband found a tick on him, and we found several inside the tent, we decided we’d sleep indoors.

PSA: If you live in an area with ticks, make sure you look yourself over very carefully. Tick-borne diseases can be pretty nasty. Believe me, I know. You can also be prepared by adding a tick repellent to your glamping gear.
What you need for a great DIY Backyard Glamping Experience:
To build your tent:
Hand tools and power tools- my husband suggests Ryobi brand tools.
Wood- 2 x 4’s or lumber you have around the house
Canvas Drop Cloths
To decorate your tent:
Air Mattress
Mattress Pad for added comfort
Bedding- I used sheets, an alternative goose down comforter, warm blanket, a white shabby chic duvet cover, pillows and pillow shams
Marquee White Heart light in basket on the bed
String of Flower Lights (on headboard)
A variety of Candles- I used white 4 x 6 candles in burlap bags, but really like the LED light candles so you don’t need to worry about the flame catching anything on fire. These ones are even vanilla scented which is supposed to be sensual.
Burlap Bags for candles
More burlap to decorate with
Chalkboard sign and chalk
Place setting- Placemat, cloth napkins, goblets, silverware, dinnerware (I love this pattern).
Flowers
Area Rug or multiple rugs
Paper Lantern and Hanging lights
Large white basket filled with throw pillows
Bug spray and/or Tick Repellant


Karen
Tuesday 6th of August 2019
How did you waterproof it?
Tonya Prater
Sunday 15th of September 2019
This was only temporary so it was not waterproofed. There is a spray that you can purchase but I don't think it waterproofs it entirely. There is also waterproof fabric that you could use instead.
Suzanne
Tuesday 30th of July 2019
Did you leave this up all seasons? I was wondering how you stored the drop cloths and if you left the frame standing or disassembled it when not using for an extended period. Your glamping tent is beautiful!! Thanks!
Tonya Prater
Sunday 15th of September 2019
Thank you, Suzanne! We only had our glamping tent up for a few weeks and in the dry season so we didn't have to worry about rain, etc. Sadly, when we didn't build it to be reassembled, although it could have been easily. We enjoyed it so much!
Darlene Bowman
Tuesday 4th of April 2017
Love it. Im in the process of trying to make one for my backyard and was wondering how many canvas cloths did you purchase to cover the whole thing?
Tonya Prater
Thursday 6th of April 2017
It really depends on how large your tent is. I bought four drop cloths. Two were really large but I don't remember the exact dimensions. Sorry I can't be more helpful.
Stella
Thursday 14th of July 2016
Love what you did!!! Thanks for sharing!
Courtney Anne Mora-Ludwig
Friday 4th of December 2015
I have never been camping let alone glamping. If I had to do it I would want the air bed and mattress topper.
Tonya
Sunday 6th of December 2015
I've never camped without an air mattress. That's a must for me!